Choose an inverted chastity cage without optional inserts: identify the base configuration, separate attachment rows, and read the redirected-geometry diagram first.
This guide is not medical advice. Stop use if significant pain, numbness, swelling, discoloration or circulation concerns occur.
An inverted cage already changes the geometry; choosing one without optional inserts keeps the comparison clean. The base configuration is the whole product you are evaluating, and every insert-style add-on at checkout is a separate decision that deserves its own evidence — not a default selection.
This guide reads the base configuration, separates the optional rows, and browses the inverted category on listings that make the configuration clear. The structure background is in the inverted guide.
Identify the base configuration
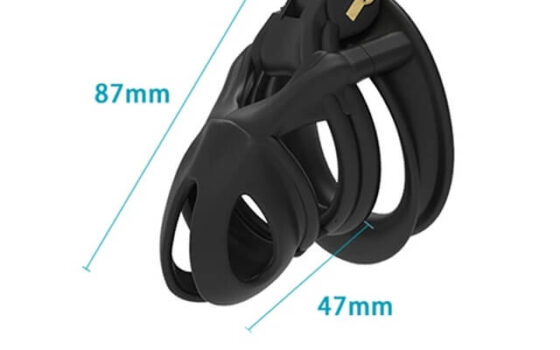
The base configuration of an inverted listing is what the package list names with no option selected: the redirected body, its rings, its lock and keys, and its stated small parts. On a documented example, the Inverted Chastity Cage lists one ABS-resin body, four base rings, a lock with two keys and five plastic locks — a complete device before any attachment row is touched.
Write the base list down before browsing options. Options are only optional when the base is fully specified first.
Separate optional attachments
Insert-style and urethral-style attachments appear as checkout rows or bundled photos on inverted listings. Treat every one as an unselected row until you have a specific, evidenced reason: they change hygiene, handling and risk profile substantially, and none of them is required for the device to function. “No insert” is a complete configuration, not a missing part.
The same discipline covers seasonal bundles and spare colorways: rows you leave unselected keep the budget for the fitting and care work that actually decides whether the inverted structure works for you.
There is also a comparison reason to skip inserts on a first inverted purchase: the redirected geometry is already an adjustment, and an insert adds a second new variable at the same time. Buy the structure plain, learn how your body reports it, and only then decide whether any add-on answers something the log actually asks for.
Read the complete size diagram
Inverted geometry needs its diagram read on its own terms: internal length along the redirected path, the exit angle relative to the ring, and the projected depth behind the body line. A front render documents none of these. The base configuration’s chart — not the attachment-equipped marketing photo — is the specification your measurement meets.
Where the chart is thin, ask for the three numbers per variant in writing. An inverted purchase without those numbers is a shape preference, not a fitting decision.
Browse only listings that make the configuration clear
Shortlist inverted listings that state the base package, separate the options, and publish their own diagrams. The inverted chastity cage collection at ChastityCage.co gathers the category in one place; apply the configuration-first reading to every candidate. Listings that blur base and options are telling you how the order will go.
Clarity at the listing predicts clarity in wear. Buy the inverted design that shows you exactly what ships — and exactly what it left optional.
A fourth habit closes the set: photograph or screenshot the configuration summary of any candidate you shortlist, the same way you would for a kit. When two inverted listings look alike in three months, the saved configurations are what make them comparable.
Base configuration first, inserts as explicit unselected rows, the redirected diagram read on its own terms, and listings chosen for clarity: the no-inserts inverted purchase in four habits. The structure is the decision; everything optional can wait for a reason.
This guide includes promotional links to ChastityCage.co. To browse the category, browse inverted chastity cages at ChastityCage.co.
Related ChastityNow guides
- Inverted chastity cages: how the structure differs